Facebook has a number of incredible different management and analytics tools like their Page Insights, Audience Analytics, and Ads Manager. Unfortunately, many of these tools are spread out across Facebook, causing some small businesses to miss out on them. That’s where Facebook’s Business Manager comes into play.
While some small business owners can even miss the Business Manager if they don’t know where to look, it’s one of the most important tools at their disposal. It offers extensive features and access to crucial tools like your tracking pixel and custom audiences, and it makes it easier for social media practitioners to connect with their clients.
In this post, we’re going to take you on a tour through the Facebook Business Manager so you know how to find it, how to navigate it, and what features you absolutely want to take advantage of for your clients.
What Is Facebook Business Manager & Why Does It Matter?
Facebook’s Business Manager is a suite of tools that offers more extensive features to Pages. It’s like a business account for your Page. It’s now called the “Facebook Business Suite,” but this change was very recent.
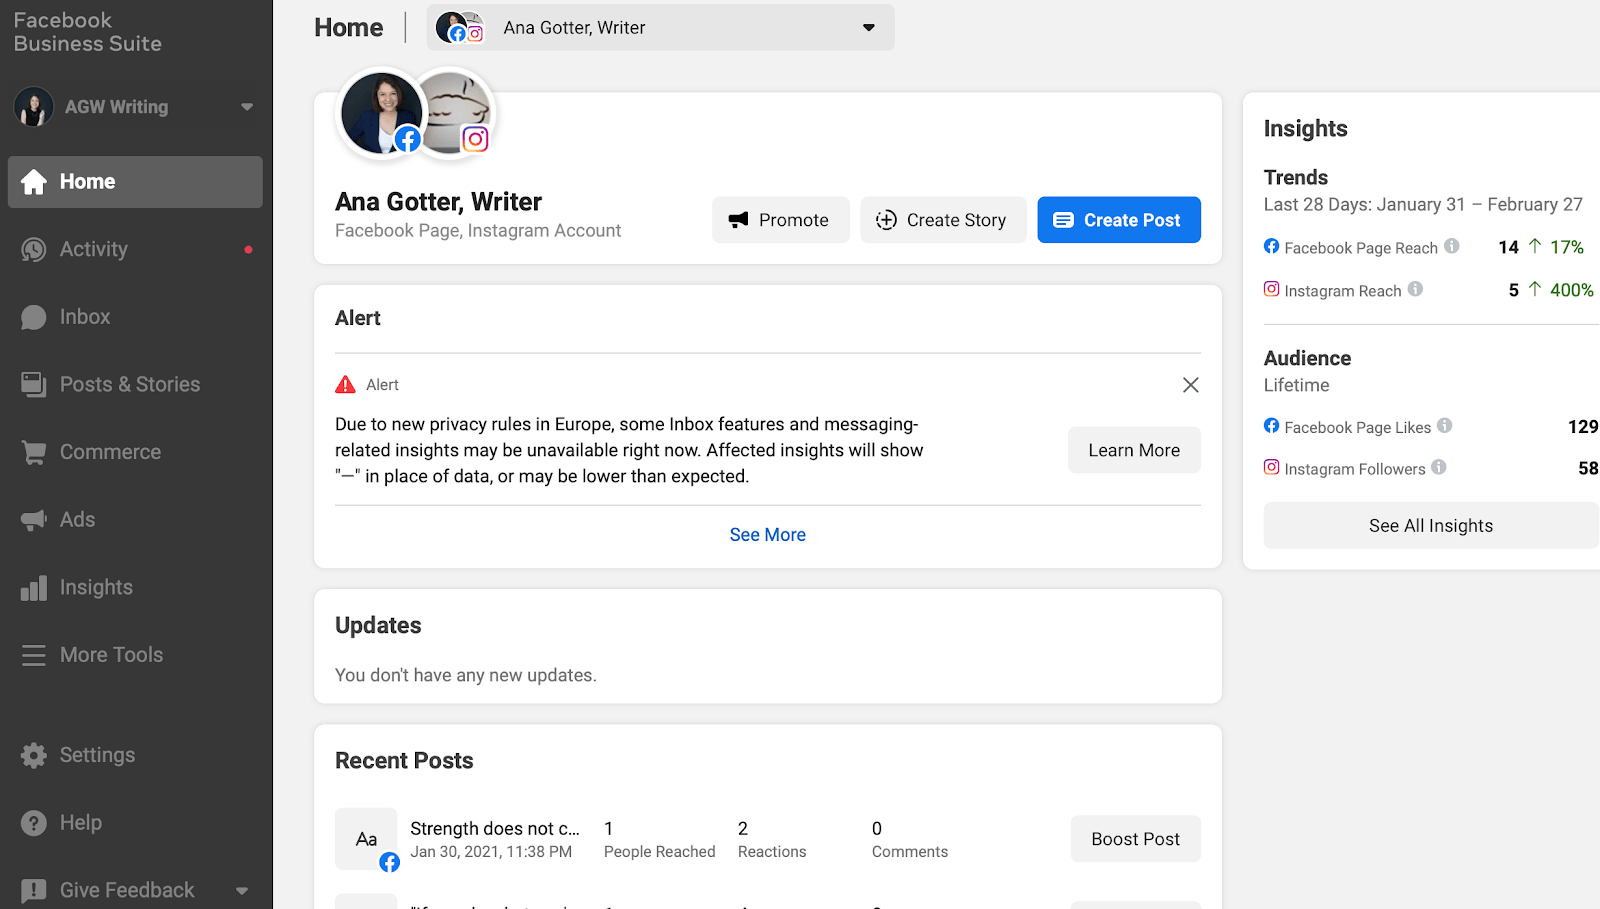
Here, you can manage your Page in its entirety. You can review its activity, set up and manage eCommerce features, track your inbox for your Page and your linked Instagram account, run ads, view insights, and more.
The “more” is particularly important. The Business Suite is where you can set up tracked events for your ads, manage appointments, adjust billing, view completed lead forms, set up tracking pixels, create custom audiences. There’s additional features here, but those are some of the highlights.
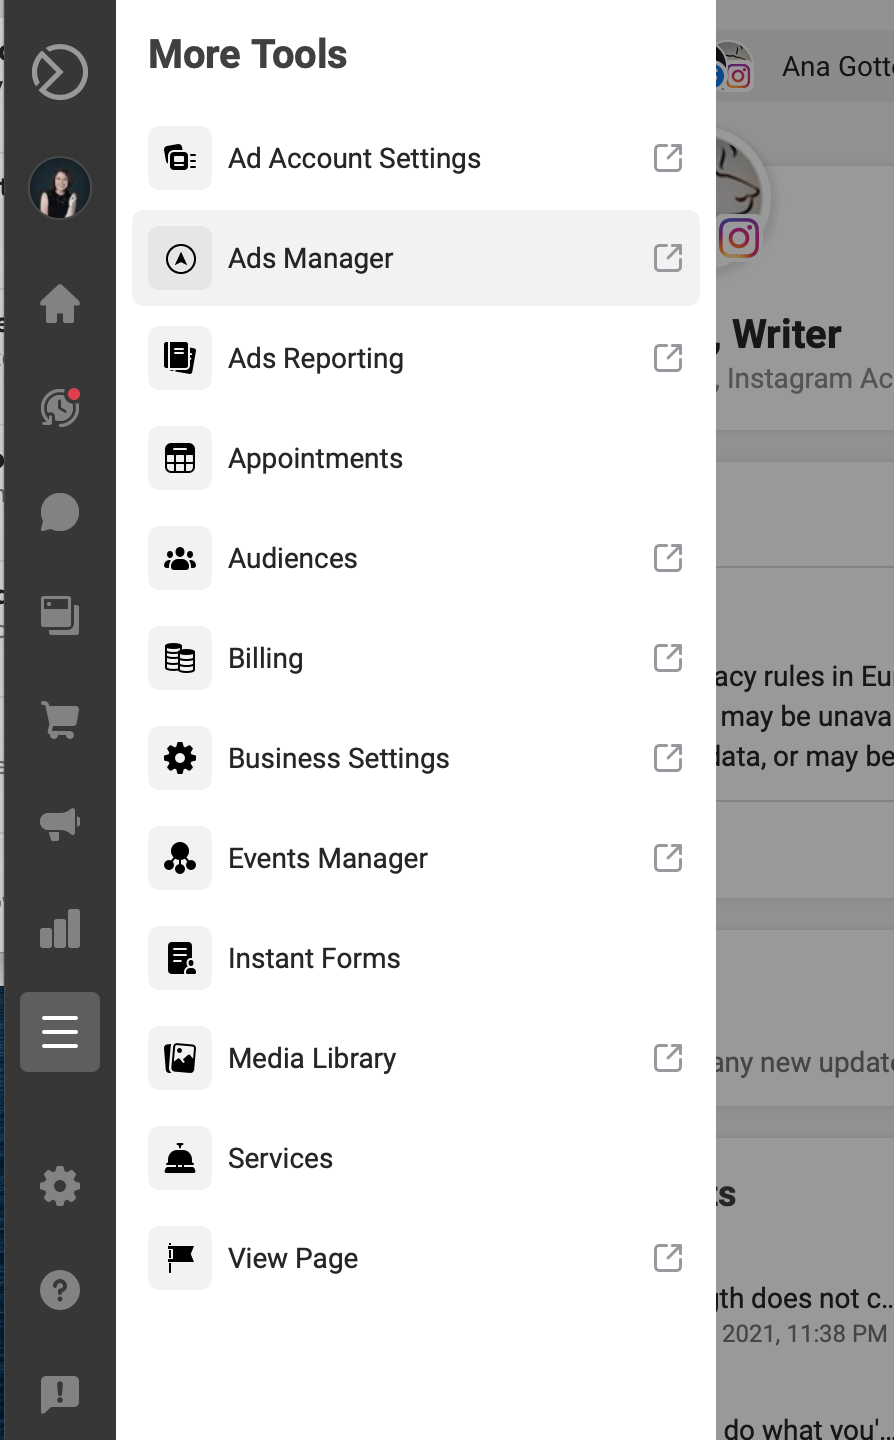
The Business Manager is also your go-to place for linking up accounts, like managing branded campaigns or gaining or giving access to second accounts (like for an agency to manage a client’s Page or ads).
The Business Suite is needed to unlock Facebook’s full potential for businesses, so don’t be intimidated; it’s particularly crucial for social media practitioners who want to help their clients for any marketing activity.
How to Access Facebook’s Business Manager
Wondering how to find Facebook’s Business Suite?
You can access the Facebook Business Manager here. This will open up the Facebook suite of tools, which has recently been revamped and looks a little different than it did even a few months ago.
How to Create a Business Account
Business accounts on Facebook are a must-have for social media practitioners.
They allow you to manage multiple assets that you don’t own, once given permission and access. So if you want to manage a client’s Ad campaigns or Pages, you can do so without them giving you their login. They’re also able to control the level of access you have.
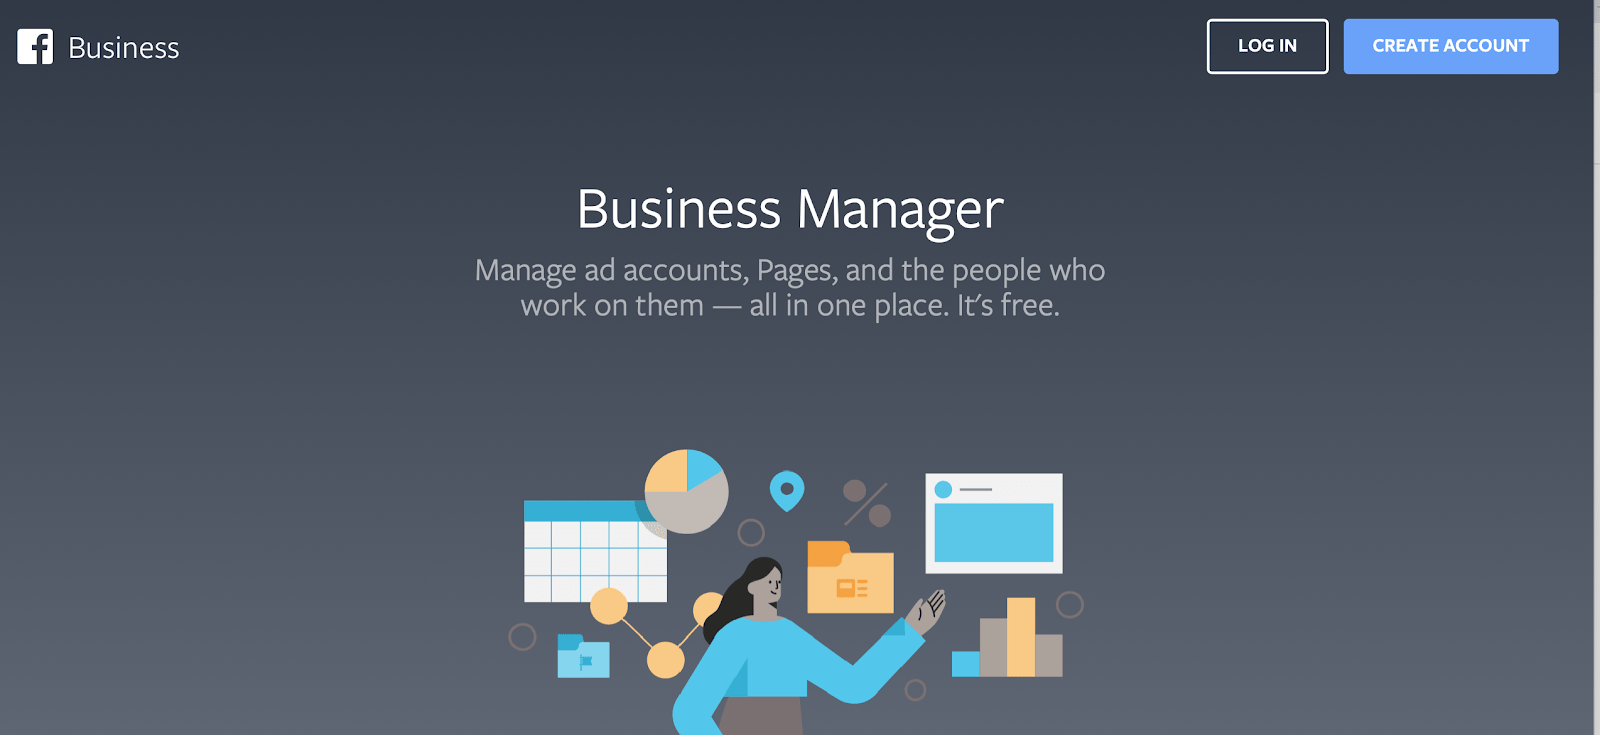
If you don’t already have a dedicated business account for yourself as a freelancer or your agency (whatever your business model is), you can create one here.
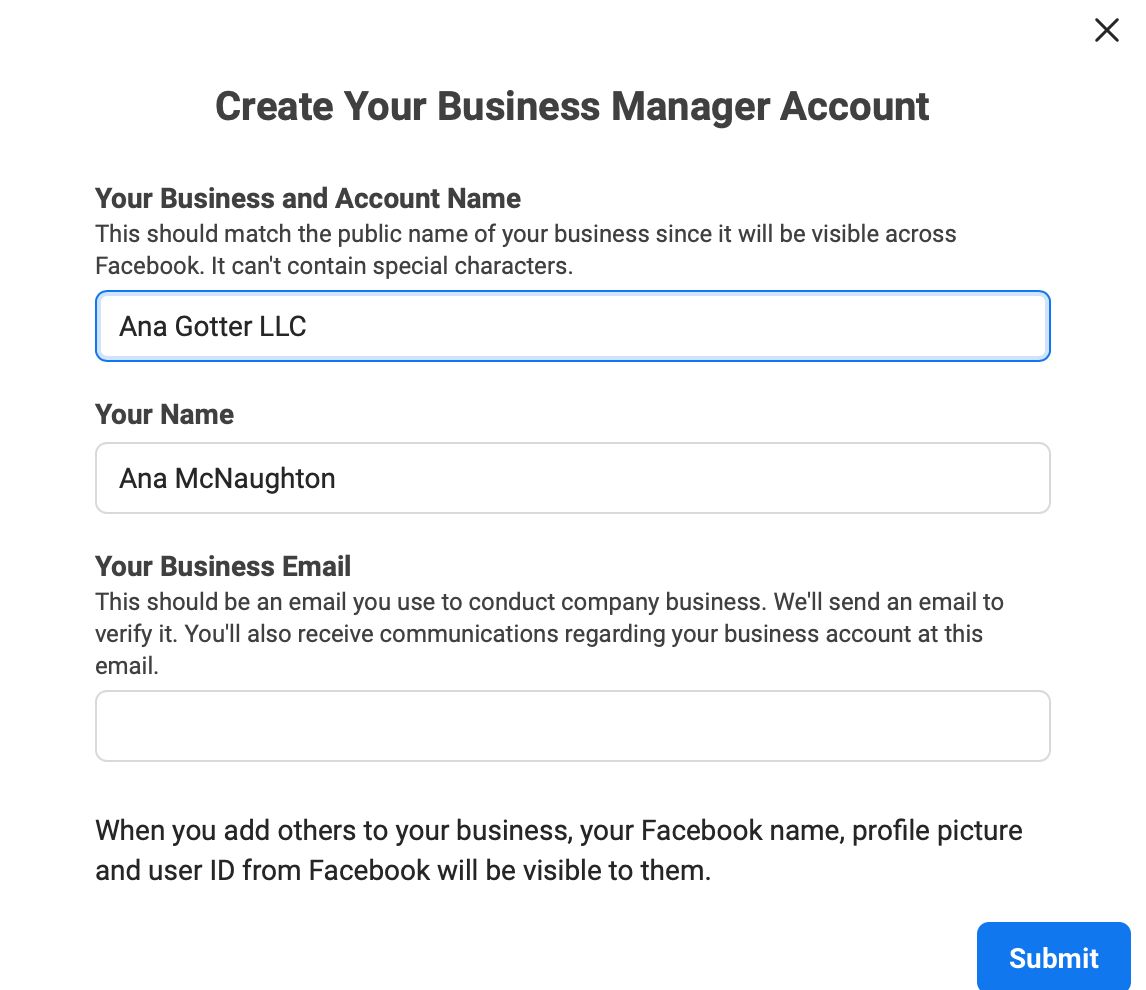
You’ll be asked to enter in your business and account name, your name, and your business email. You’ll confirm the account through email verification.
How to Set Up Your Business Manager
If this is your first time using the Facebook Business Manager, there are a few things you’ll want to do to get started so that you can get the most out of it and access what you need to.
First, you’ll want to connect other accounts to your business account
How to Add Assets to Your Facebook Business Manager
When you have a brand-new Facebook Business Manager account, this is the first thing that you’ll see:
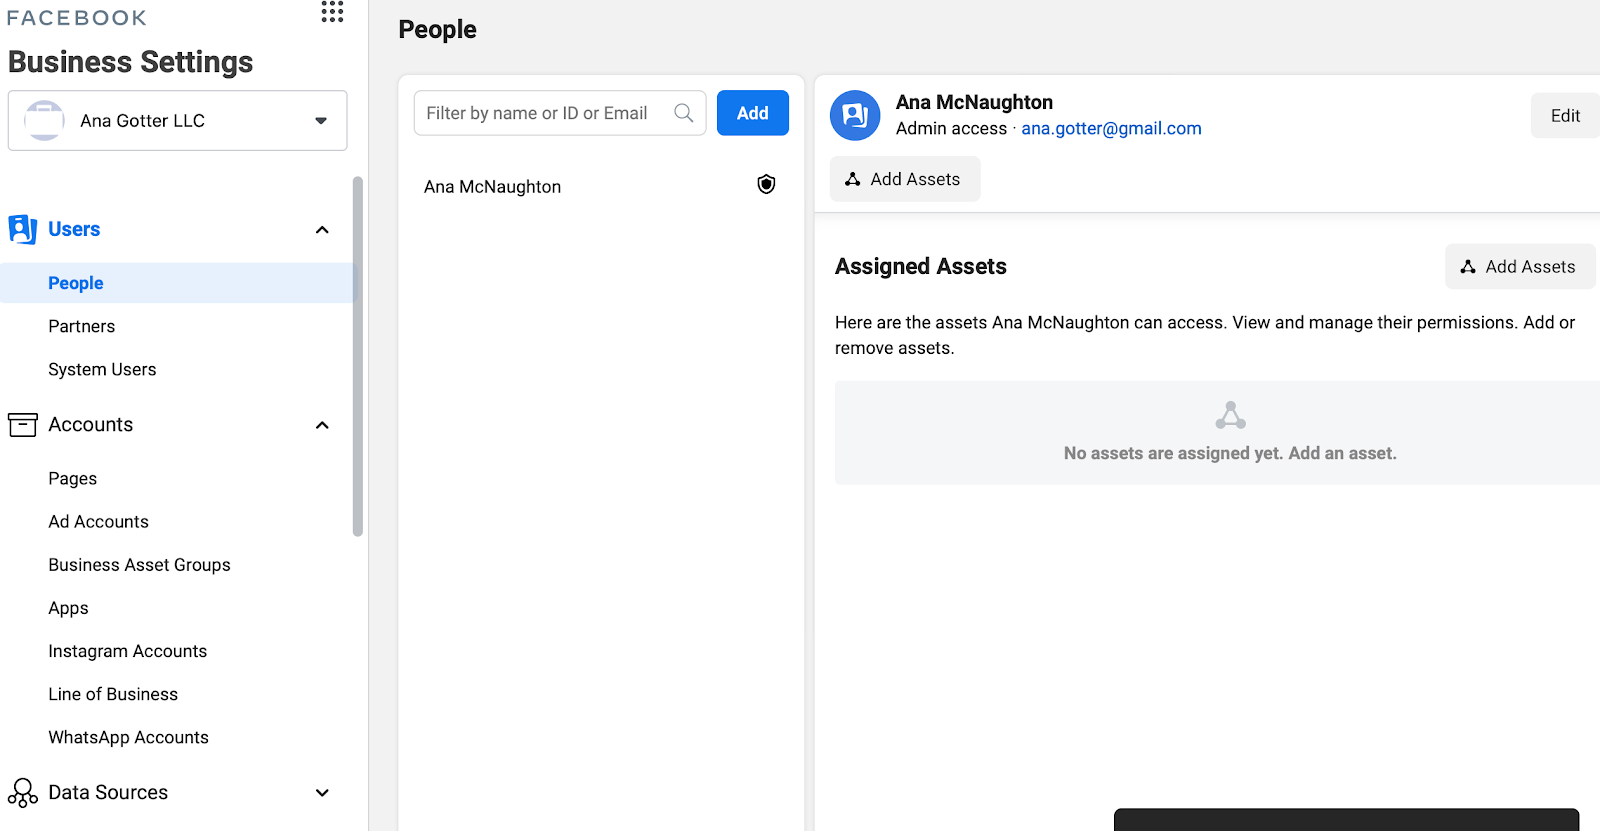
It will have your name, and no assets yet assigned. Assets are ad accounts, Pages, and Instagram accounts.
To add one, you’re not going to click “Add Asset” like you might think. Instead, you’re going to look at that left-side navigation bar and go one-by-one to the different types of accounts you want to add.
So let’s start with a Page. Click on “Accounts,” and then “Pages” in the navigation bar. That will pull up this screen:
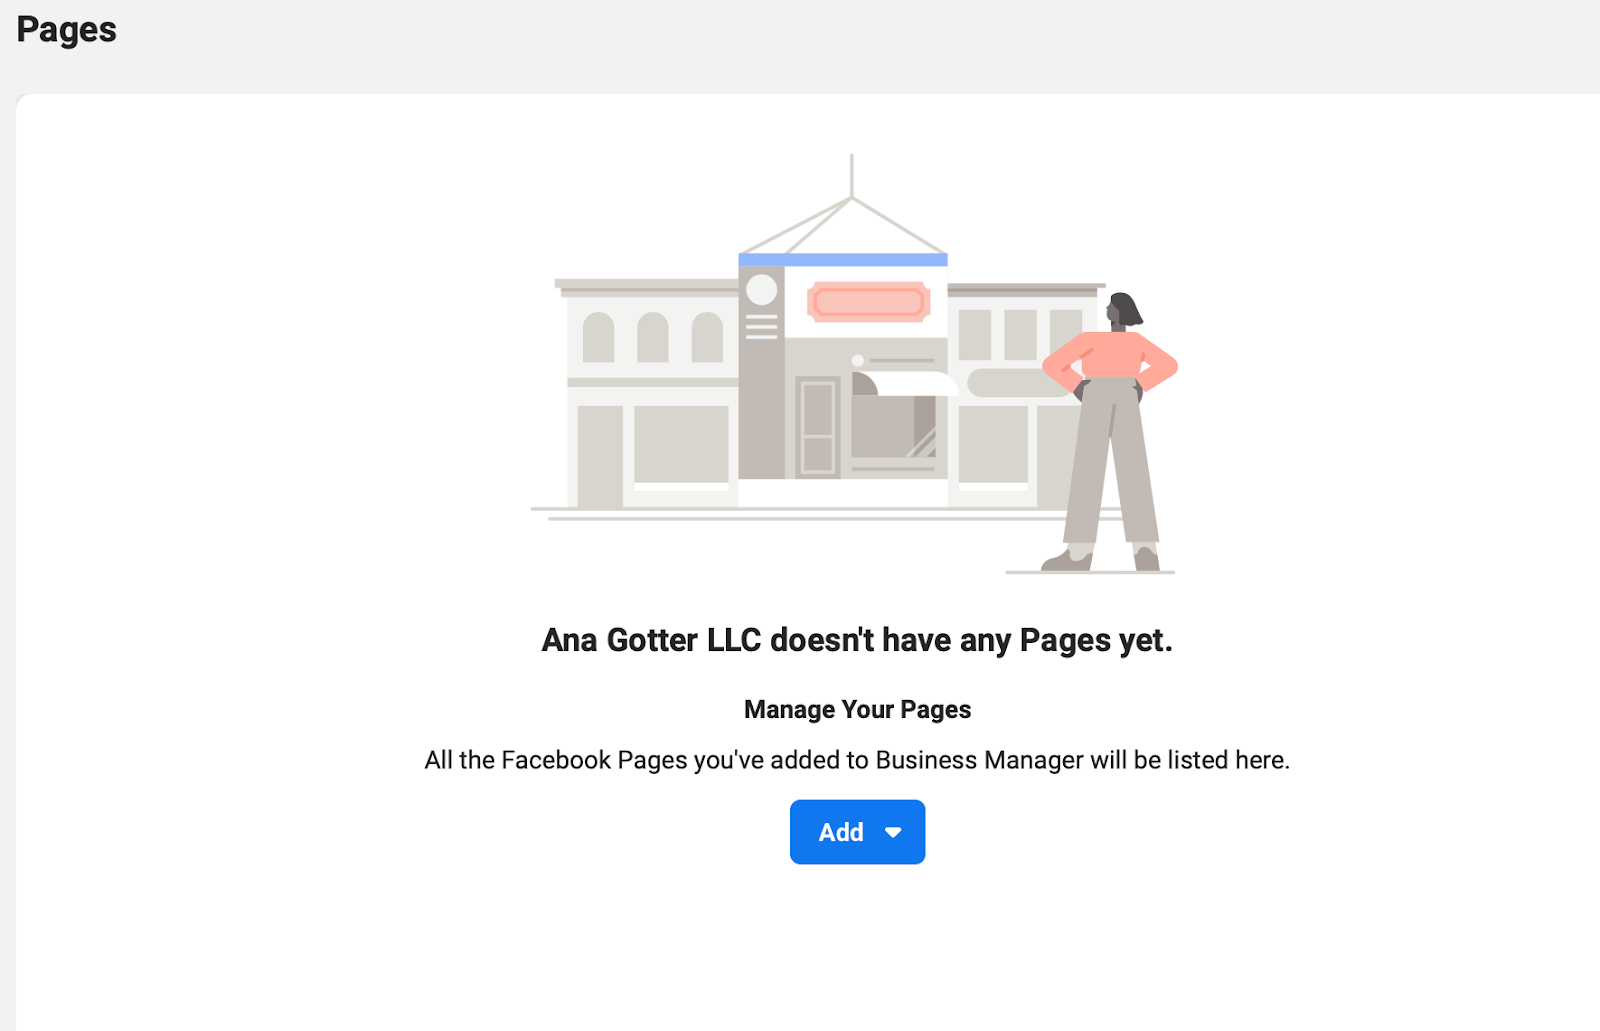
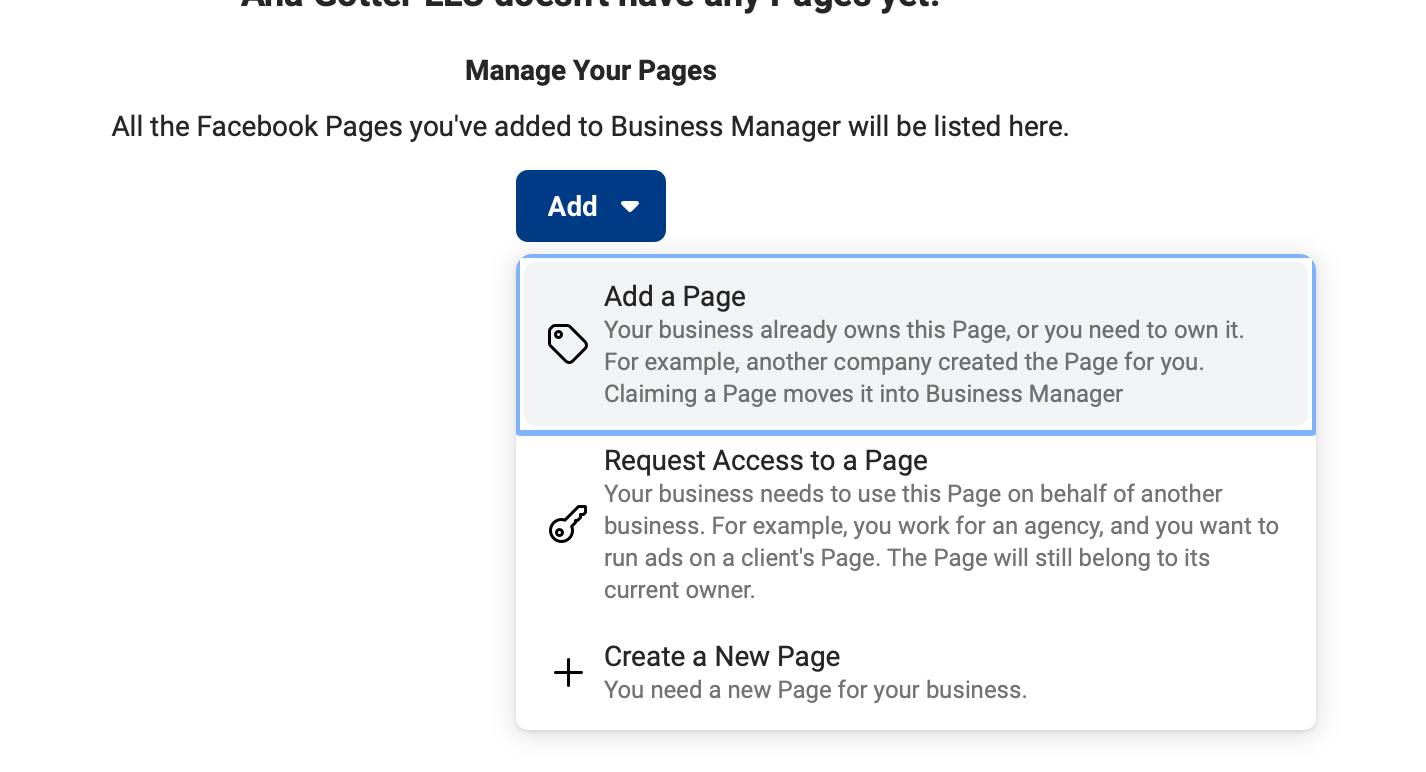
Click on “Add,” and you’ll see the option to Add a Page that you already own, request access to a Page that another business runs, or create a new Page. Before you request access to anything, you’ll need to have a Page of your own; you can add one to claim it, or create a new Page for your business.
How to Connect to Client Accounts through the Facebook Business Suite
Want to connect to a client account?
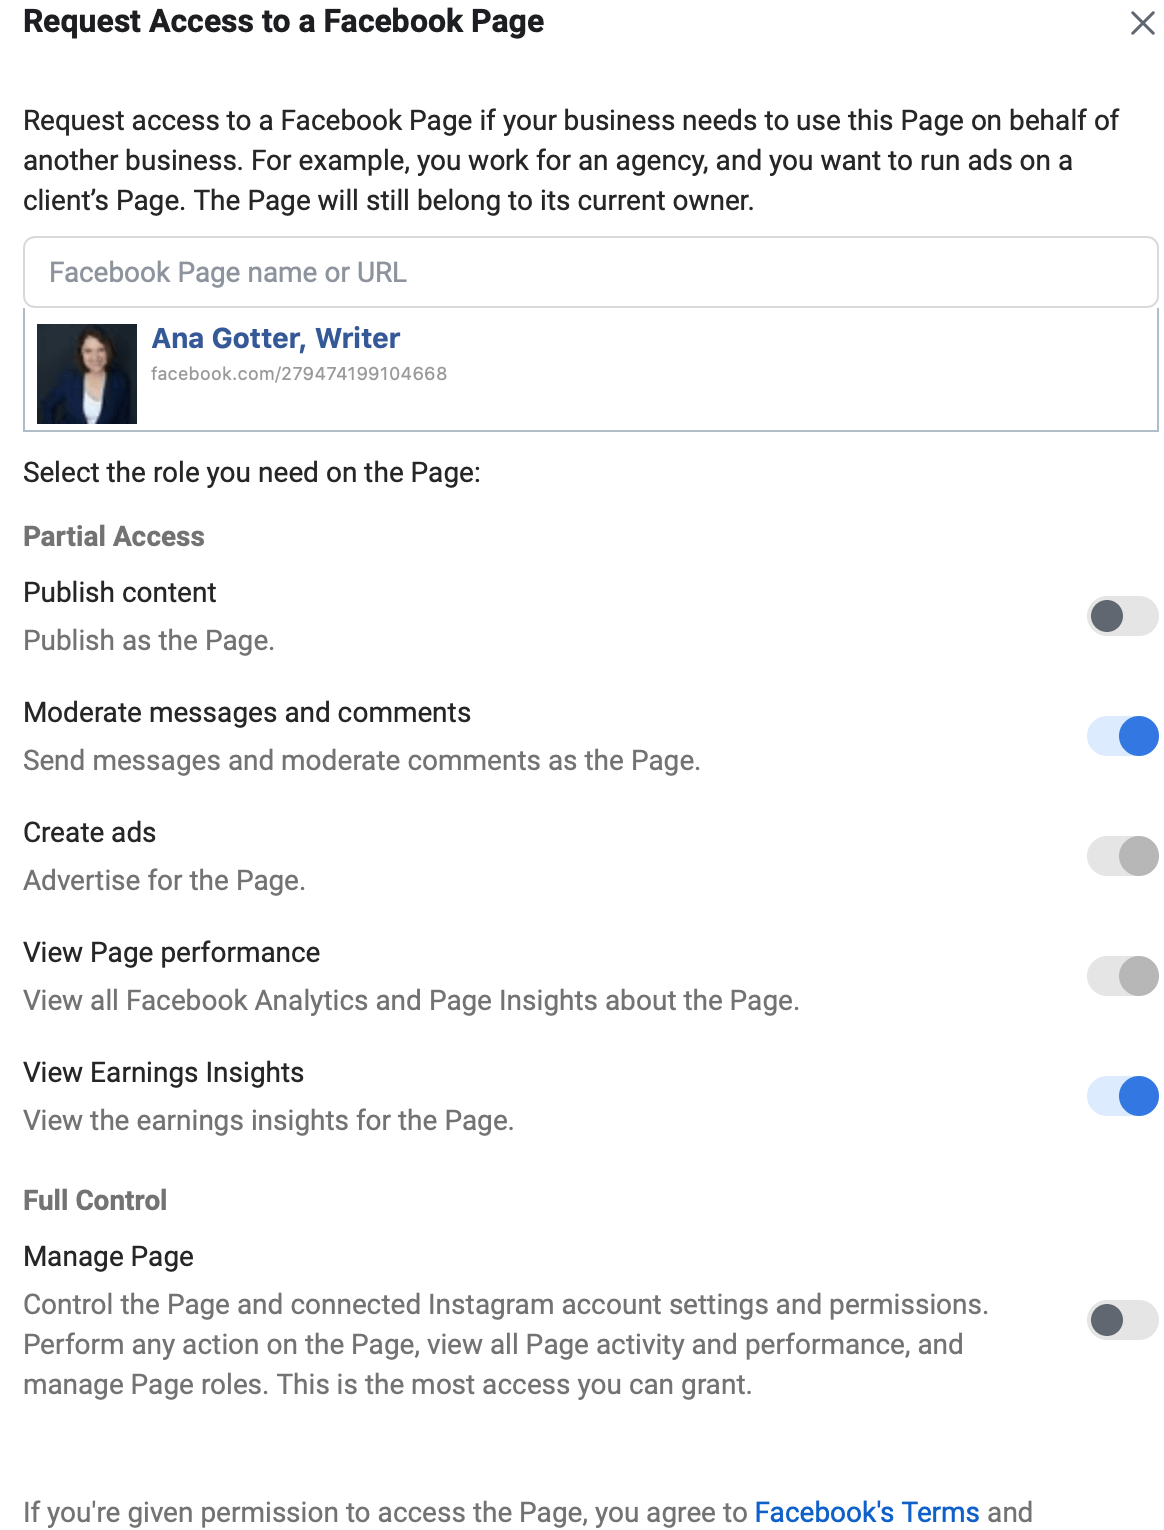
First, let’s add a client’s Page. Once your own account is claimed and you have a primary Page, click on “Request Access to a Page.” You’ll then confirm that your business account will be the one gaining access, and search for the Page by its name or ID.

Once you do, you can request access to specific roles. You can gain access to publish content, moderate messages and comments, create ads, view analytics, and even fully manage the Page. The client can turn this off at any point. Your request will be sent to the client, which they can then approve.
The process for adding other accounts is similar. You can do this with your Instagram account, for example, to claim it if your Page wasn't already linked to it.
To add an Ad account, go to your “Ad Accounts” just like you did for “Pages” and click “request access.”
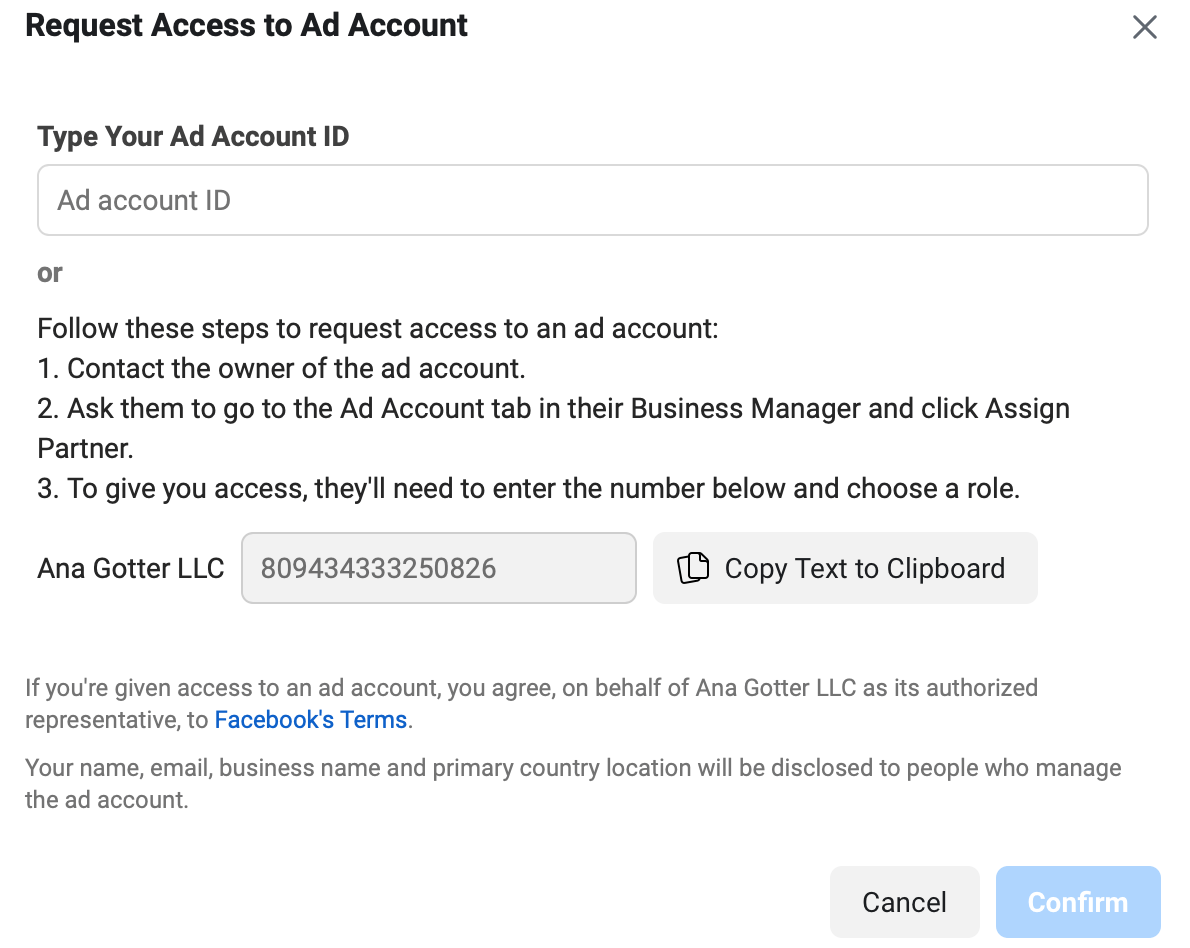
You’ll have two options for set up. The first is to type in the ad account ID you want to request access to. They’ll have to give you that. Or, you can ask them to “Assign Partner” and enter in the ID number listed. It’s often easier to go the second route, as clients may struggle to find the right information otherwise. (Speaking from experience).
How to Add Other Users to Business Manager
If you’re working at an agency, you likely aren’t working alone. This means that you’ll likely need other people to have access to certain accounts (with all participating parties’ permission, of course).
To add other users to your business account, go to “Users” and then “People.”
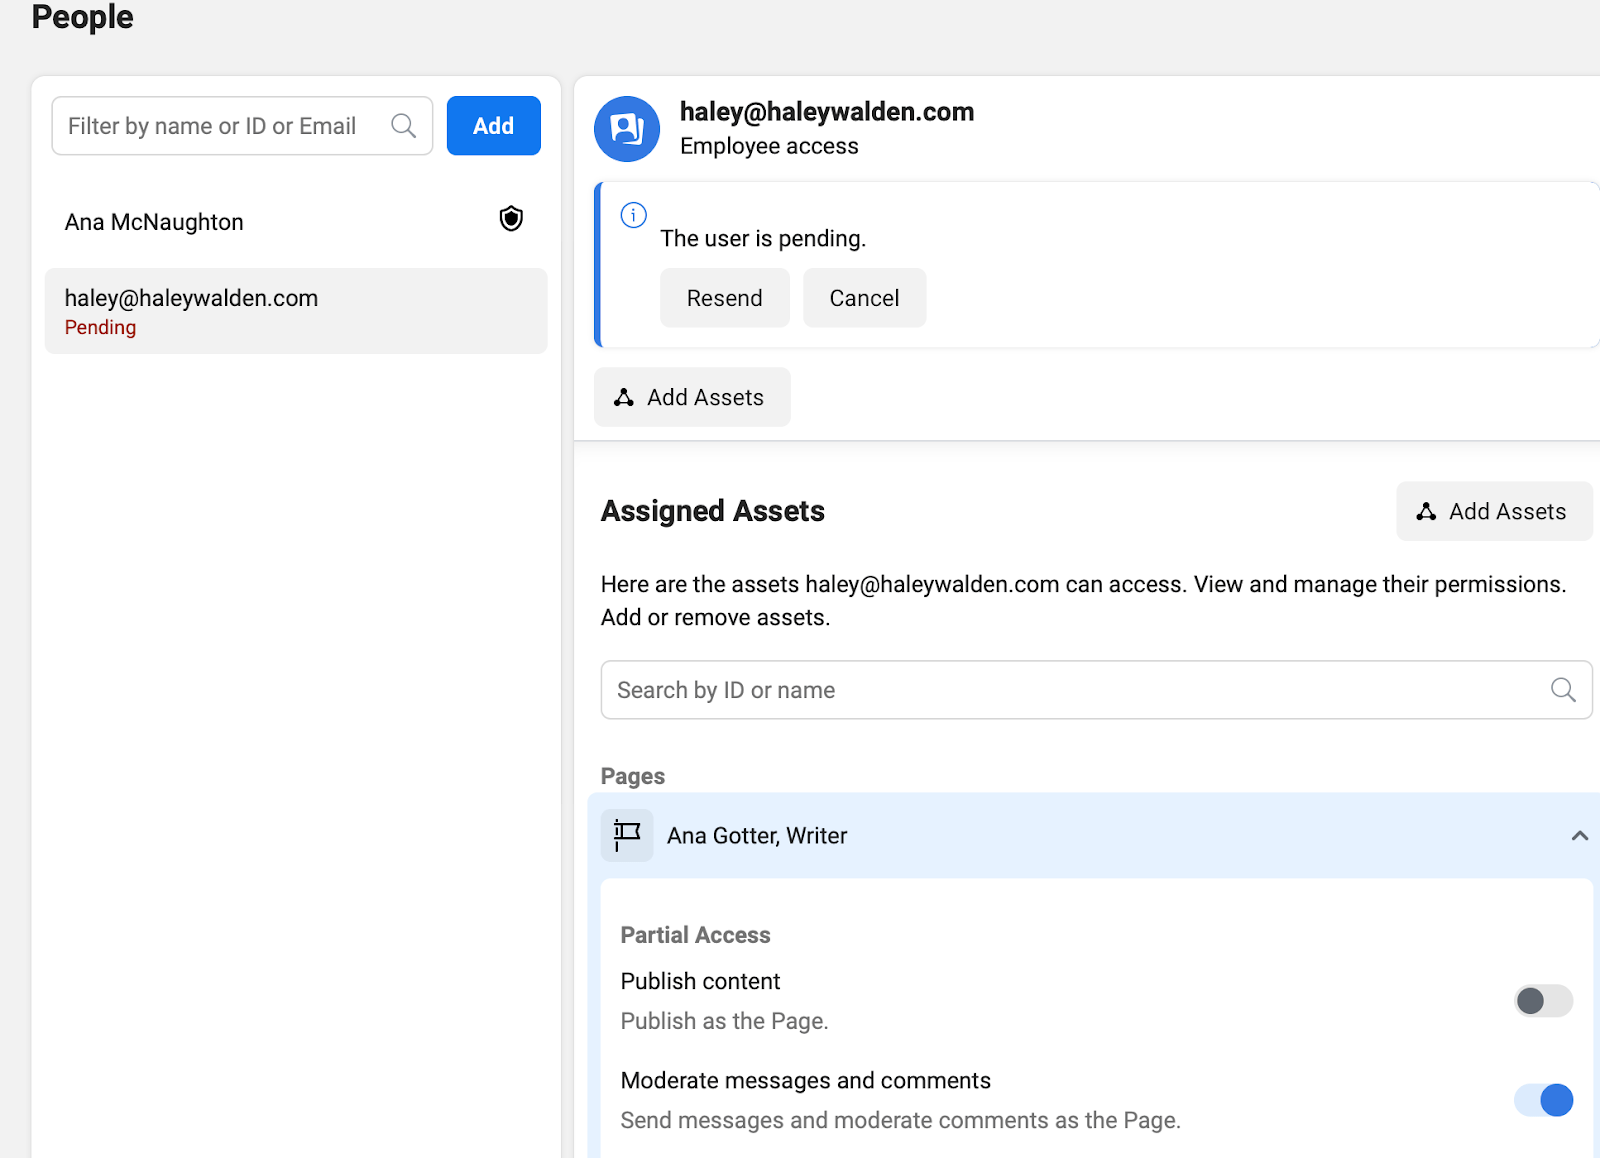
You’ll see the option to invite people to your account. Enter in their email address, and decide whether they’d like to have employee access or admin access. Admins have access equal to you; employees must be assigned to specific accounts and tools. In most cases, it’s best to add people as employees.
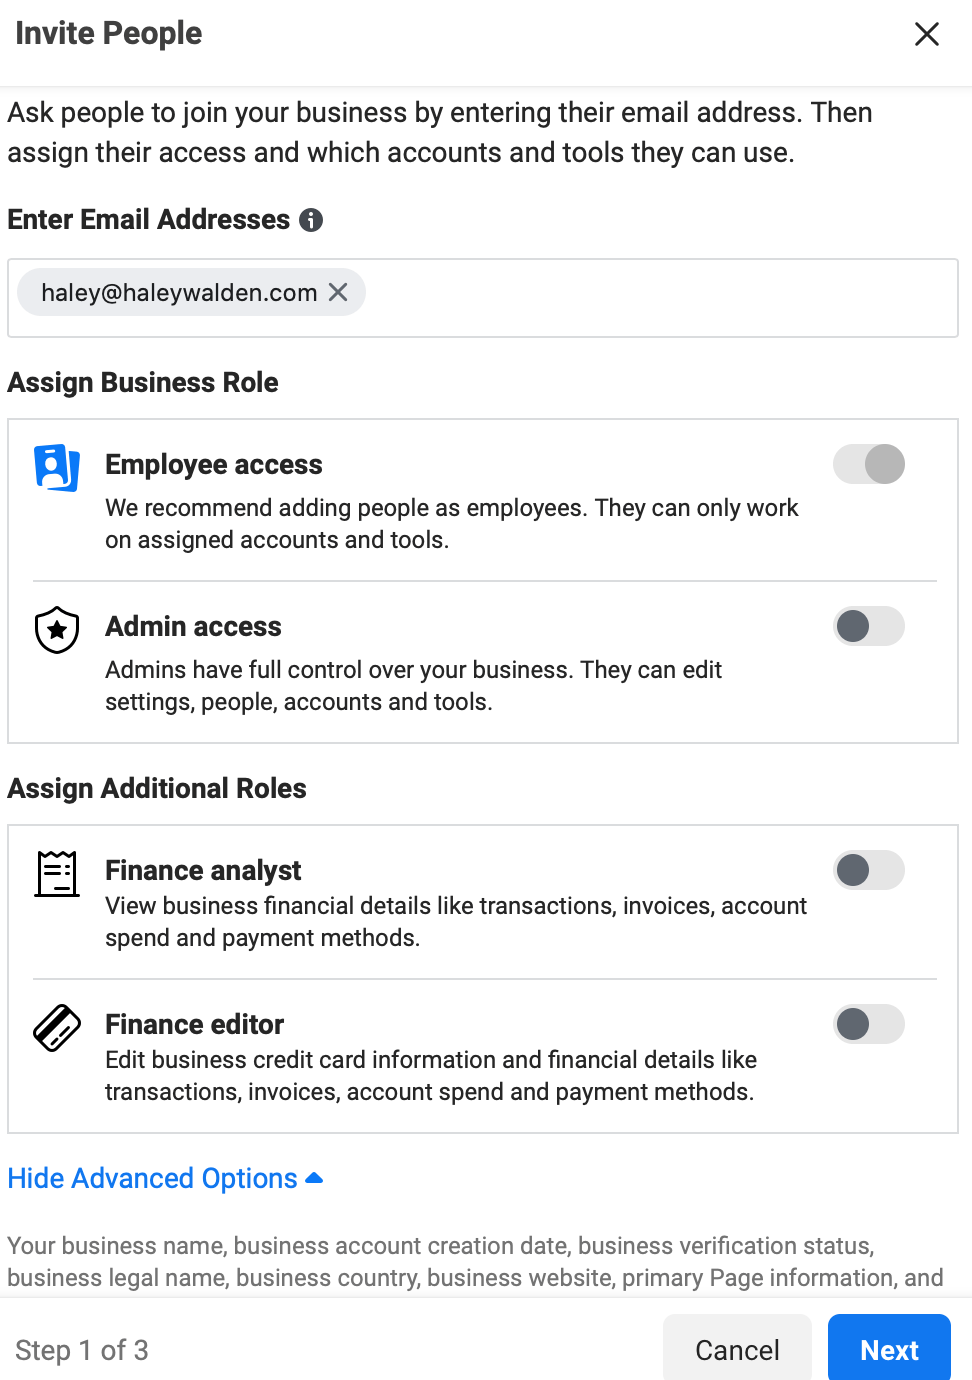
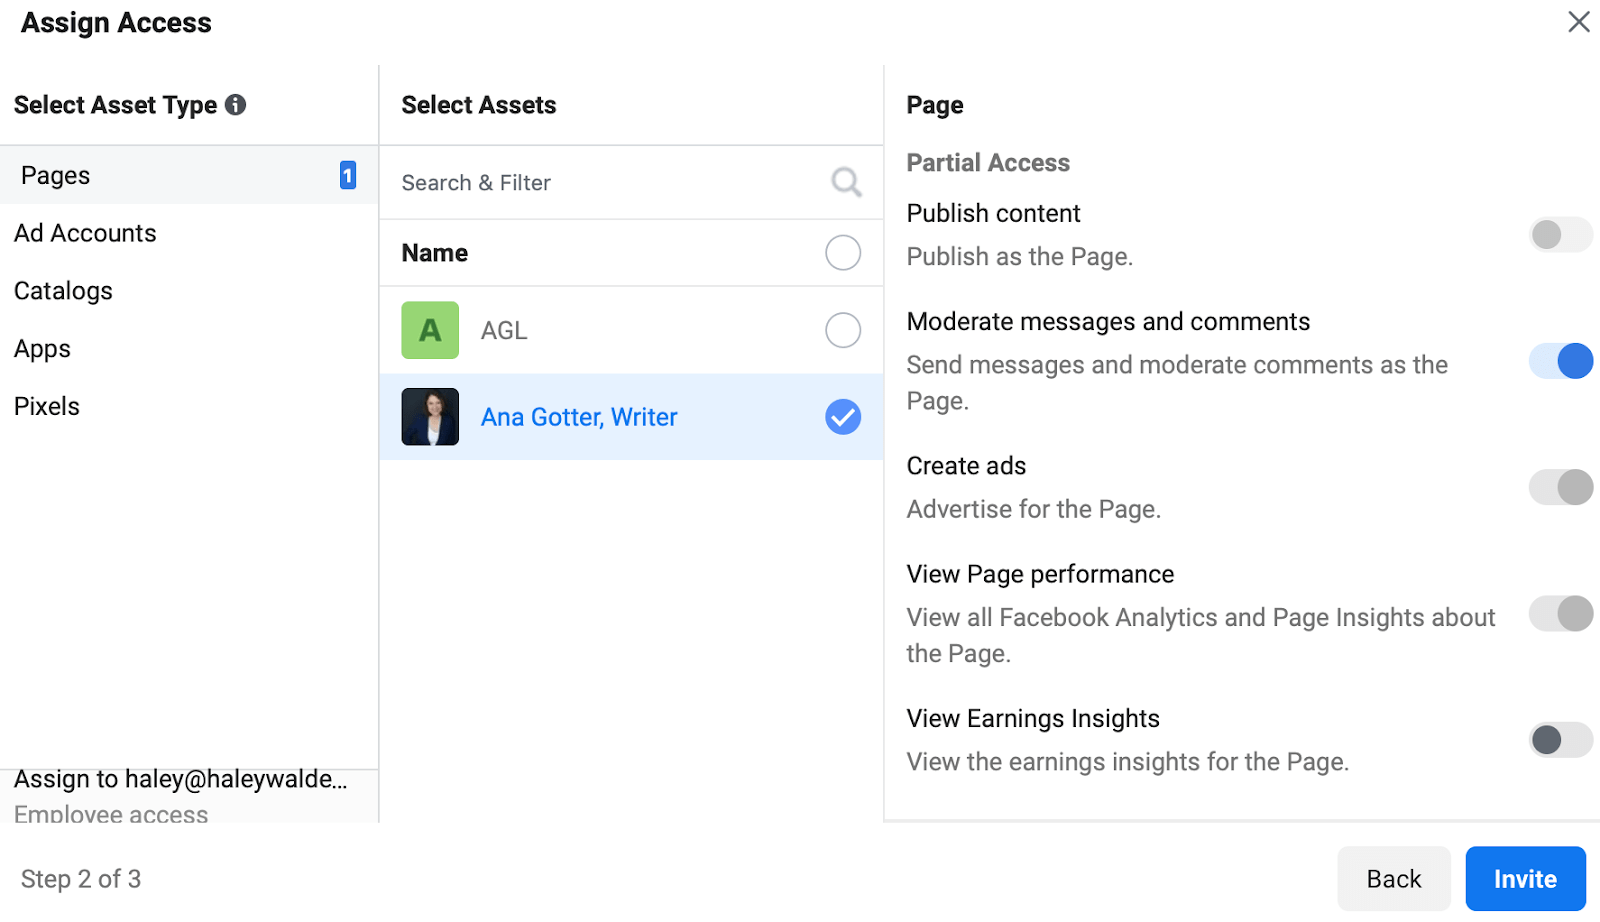
Once you do this, you can choose which accounts you’d like them to have access to, and what you’d like them to be able to do. Invite them via email. You can adjust these roles at any point.
How to Navigate the Facebook Business Suite
The basics of your account are now set up! Now let's take a look at how to navigate
The first thing you’ll need to do when moving through the Business Suite is to ensure that you’re using the right account, as you can use it with a personal account connected to a Page or ad account or a business account. In our post, we’ll be using a business account as an example.
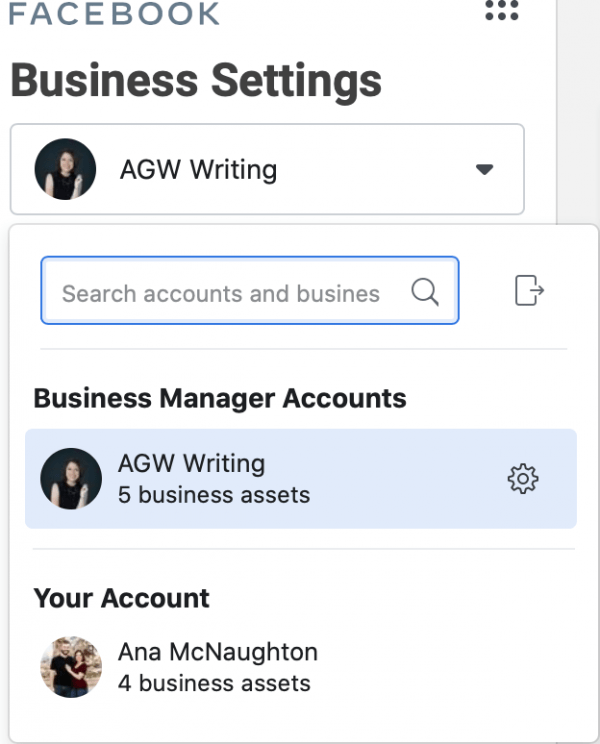
To ensure you’re using the right account, click on your profile picture and choose the correct option.
Once you do that, let’s get started!
1. View users & their account access
Want to review the team members who have access to different accounts and see or edit exactly what they can do? Go to People, and then you can view each individual account that’s connected to yours. You can resend invites, adjust their roles, or remove them at any point.
2. Add & Manage Product Catalogs
Product catalogs allow you to run more automised and dynamic ad campaigns. You can also use them to create Shops on Facebook and Instagram.
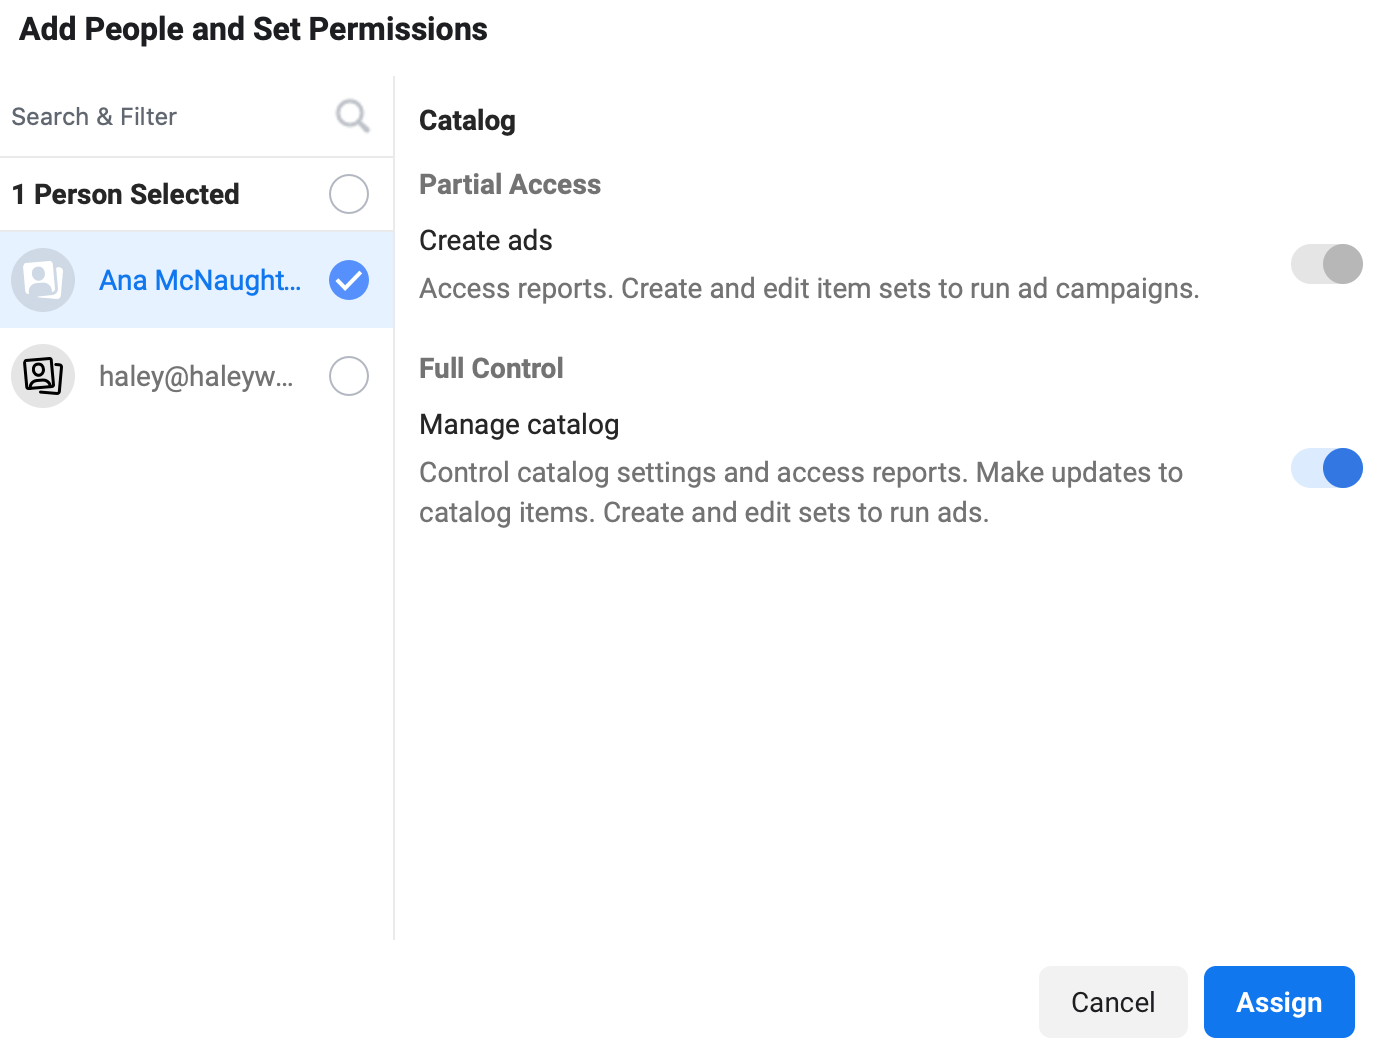
To add or manage your Product Catalogs, go to “Data sources” and then “Catalogs.” You can either create a new catalog or request access to one.
When creating a new catalog, choose who you want to have access to the account and what they’re able to do. Then upload your catalog either manually, with a feed from a third-party integrating site, or with an excel file.
3. Set Up Tracking Pixel
Your Facebook tracking pixel is essential. It can help you track off-site conversions driven by ads to assess and optimise performance; it can also help you track user activity to create retargeting campaigns.
To set up or customize your tracking pixel, go to “Data sources” and then “Pixel.”
If you don’t already have a pixel set up, you can create one now, and you can learn more about installation options here.
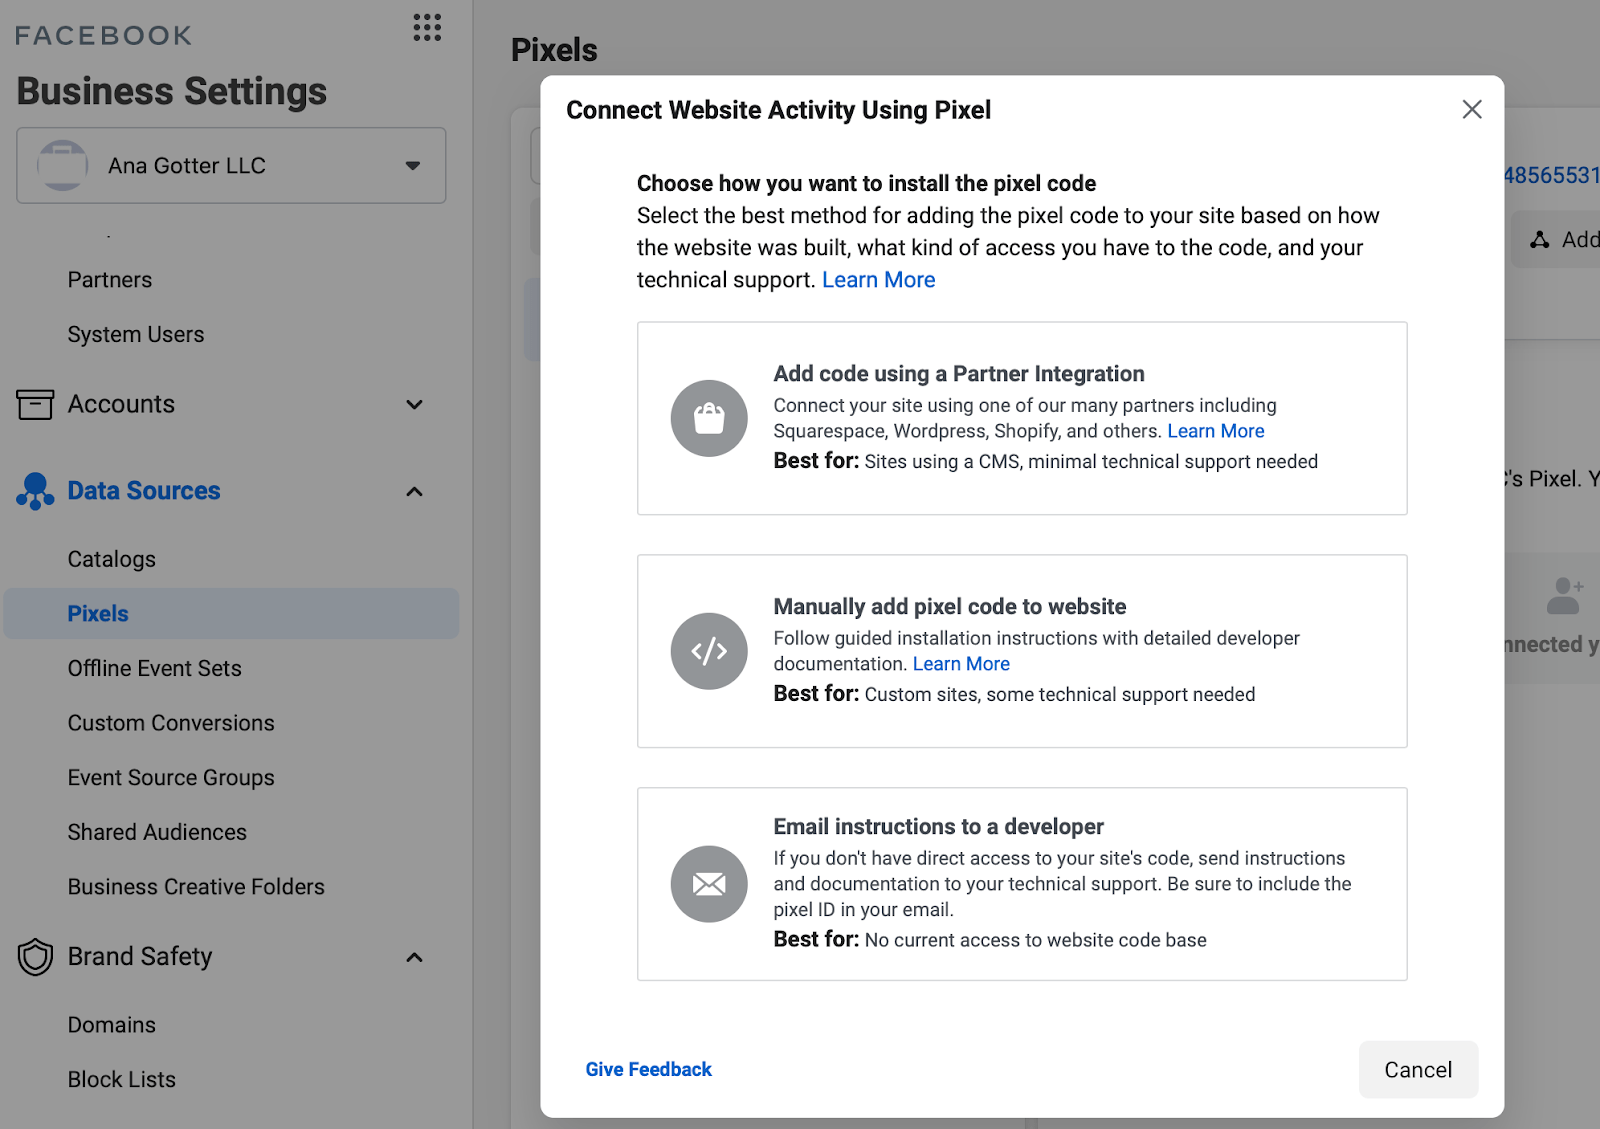
Once you do this, you can set up “events,” which are trackable actions. This includes adds to cart, purchases, registrations, and more. You can also set up offline events (like actions taken in-store and not online) and custom conversions.

4. Set Brand Safety Restrictions
Brand Safety features allow you to block your ads from appearing in or before videos or on sites or apps of users that you don’t want your business to be associated with. If you’re selling organic, sustainable kids clothes, for example, you might not want an ad shown on a video where an influencer is laughing about how much garbage they make while cursing up a storm.
This protects your brand’s image, and it can be found under the “Brand Safety” tab.
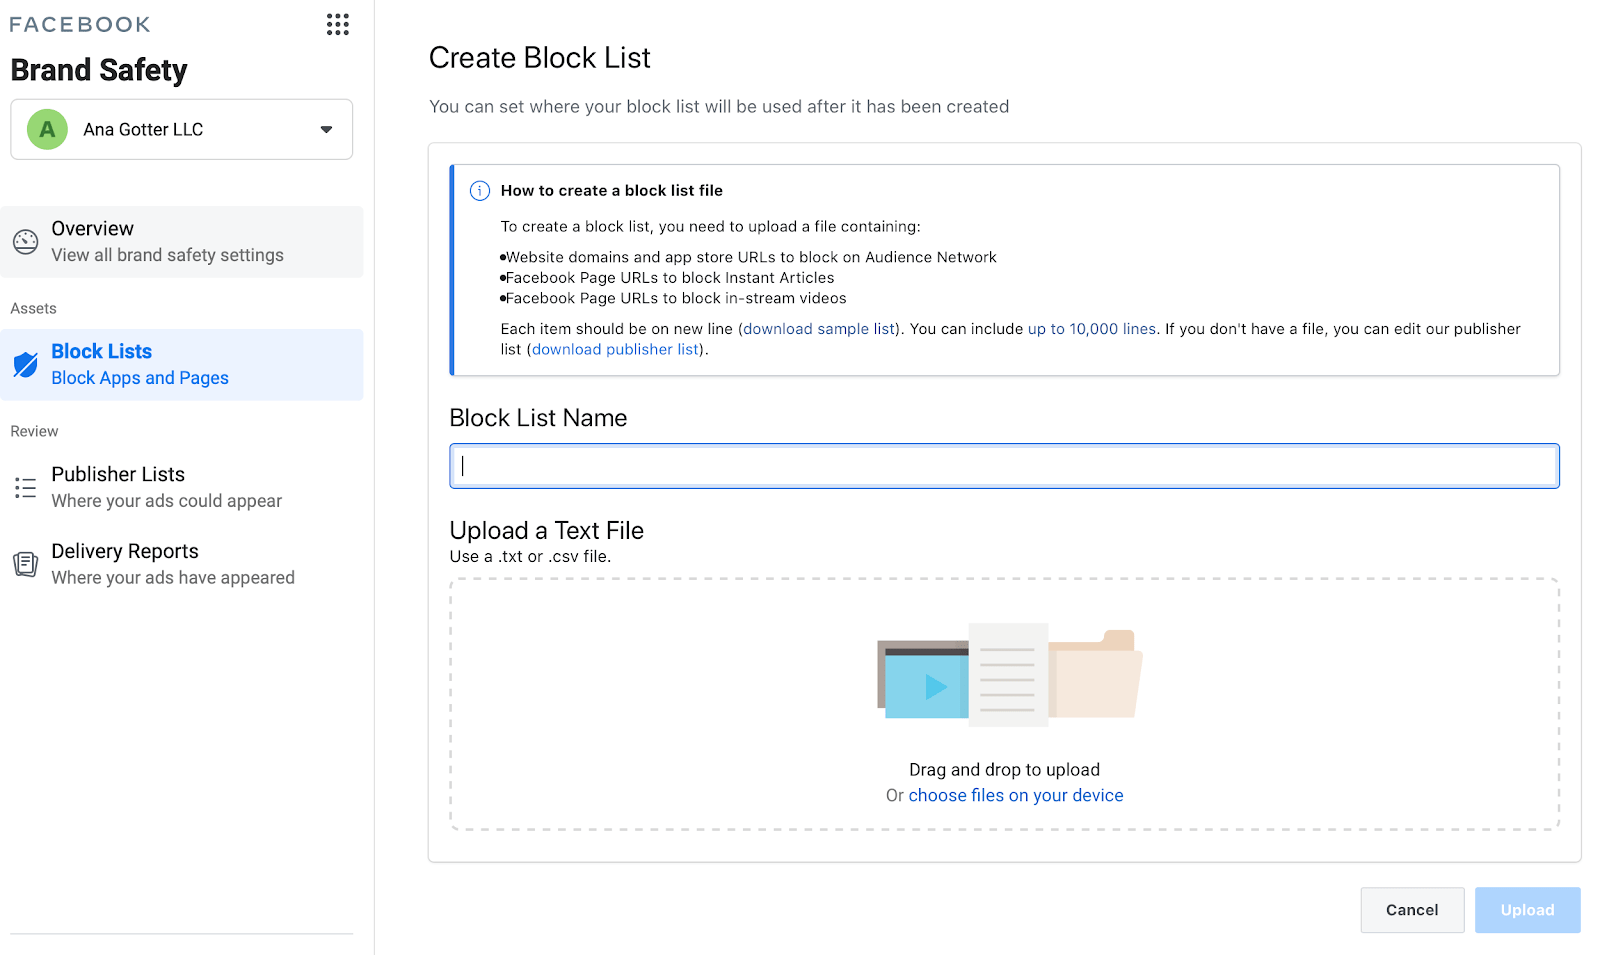
To block sites, click on “block list.” You can then either search for users or enter in an excel file.
5. Manage Integrations
There are a million and one excellent platforms that can integrate with Facebook Pages and ad accounts. Think social management software like Agorapulse, ad management tools like AdEspresso, and even automation options like Zapier.
You can manage integrations under the Business Manager by choosing “Integrations.” You can also control who has access to completed lead forms here, giving access exclusively to certain users.

6. Set Up Two-Factor Security
Two-factor authentication is an enormous asset for the security of your account. You should already take that seriously, but it becomes particularly important when you have access to the accounts of others, too.
Go to “Security Center” and then find Two-Factor Authentication at the top corner. You can require that no one is required to do this, that admins only are, or that all employees are. We strongly recommend the last option, as it can protect you and your clients.
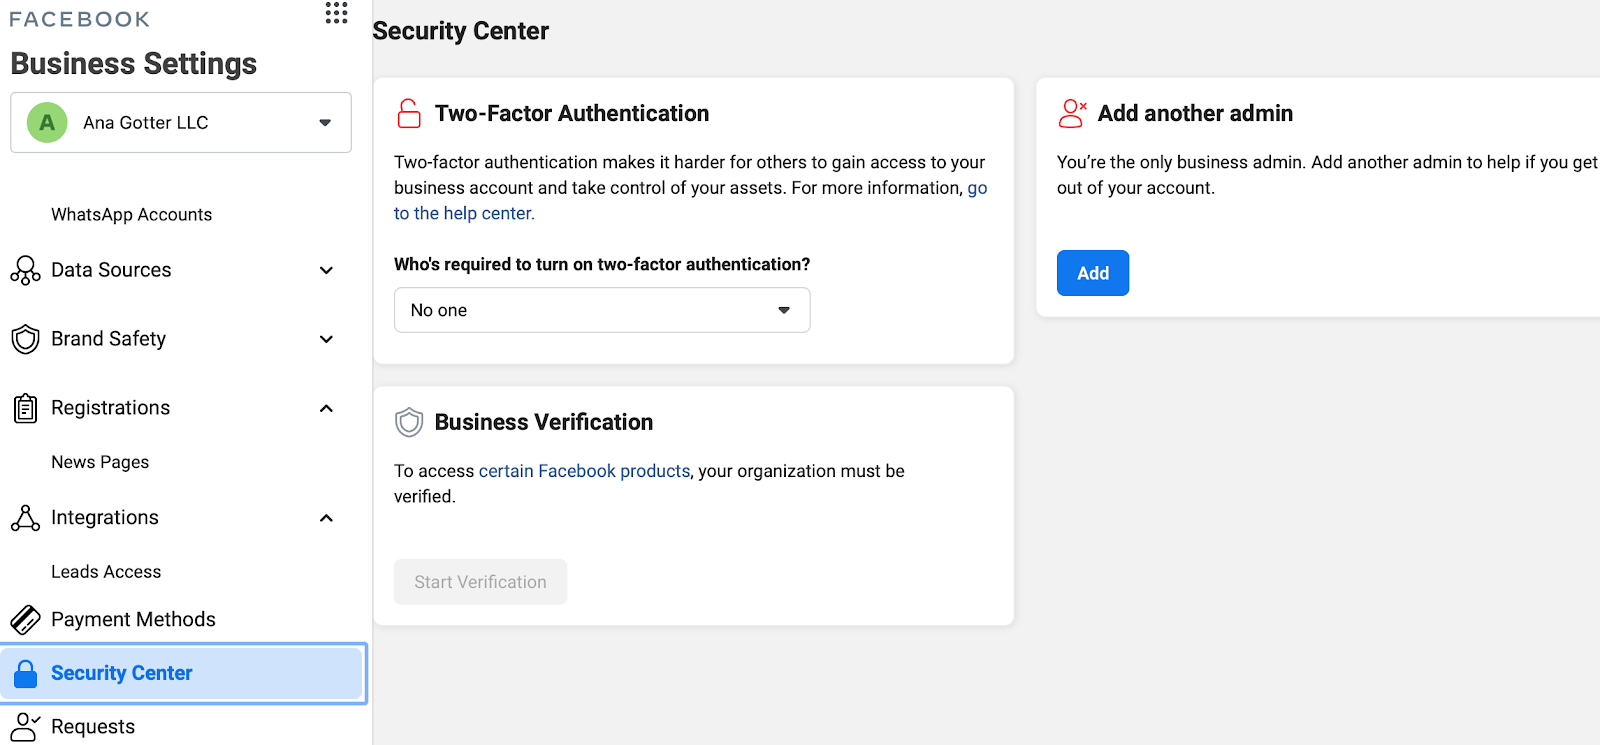
Underneath this, you’ll also see the option to start the process for business verification. This can unlock new features and Facebook products, so we recommend moving through the process.
Final Thoughts
Facebook’s Business Manager can be overwhelming at a first glance, especially for new marketers or small businesses who aren’t familiar with the platform yet. It’s well-worth learning, however, as it’s the only way to unlock some features and the easiest way to access others.
If you want to reach the full marketing and advertising potential of Facebook for your own business and your clients, this is a must-have tool.
And, before we go, here are a few recommendations we have:
- Regularly review your settings. It’s not uncommon for employees to leave the company (whether on good terms or not) and to completely forget that they have access to your accounts or your clients’. Making it a habit to check in at least once every other month or after any major personnel changes is a good call. If you expect an employee to leave on bad terms or to be vindictive, it’s best to remove their access before breaking the news to them if possible.
- Require two-factor authentication. I know we discussed this in the last section, but it’s so important we wanted to mention it again. This protects everyone’s accounts; no employee should ever have a problem with that.
- Opt for automated options when possible. Product catalogs are a great example; you can upload them manually, but you can also connect Facebook to a product database on Shopify. The latter will update automatically with information like current pricing and inventory levels. That can save you an exceptional amount of time.
- Check in after major platform changes. Have you noticed that there’s a new algorithm or a new interface? Take a look around the Business Manager, especially if you don’t follow social media updates regularly. This will help ensure that you haven’t missed anything that requires you to make changes.
Aside from that, spend some time poking around Facebook’s Business Manager to get used to the interface and see about other specific features that could benefit you.


%20(3).png)
.png)
.png)


